When beginning to cook for yourself or others, it is necessary to understand how to correctly use kitchen knives and choose the right instrument for the job. Knife skills contribute to your overall enjoyment and ease when making food. This article will teach you how to pick the best kitchen knife for the job, how to properly handle it, and how to preserve it.
See the associated wikiHow articles for instructions on using knives for survival, throwing knives, fighting with knives, carving, working leather, and other similar tasks outside the kitchen.
Part-1 Using Kitchen Knives
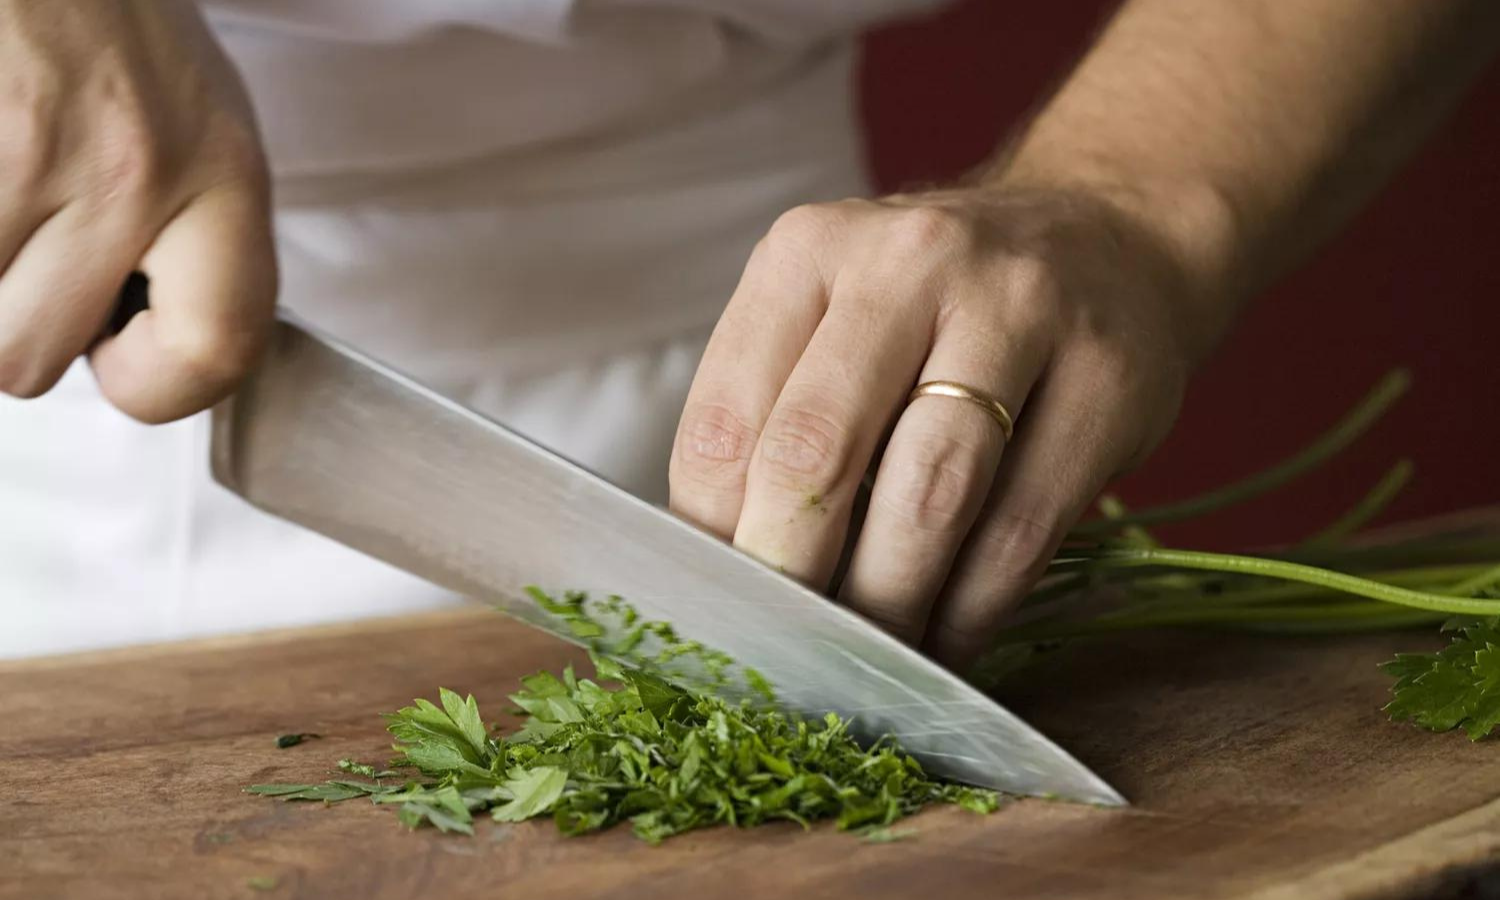
1. Learn to hold the knife correctly. Grasp the handle of a kitchen knife as though you were about to shake hands with it. While picking up a kitchen knife, the index finger should be placed on the outside of the blade, on the flat side, while the other three fingers should be coiled up to the top of the handle, just at the blade. It must be perpendicular to your body. This is known as the pinch grip, and it is the correct technique to hold a kitchen knife for maximum control and precision when cutting. Because your fingers are closer to the blade, you have greater control and can direct it more precisely.
- Keep the knife’s tip and blade pointing down at all times when holding it for safety’s sake. Kitchen knives must be maintained razor-sharp, so use caution while handling them.
- When taking up a knife, many unskilled cooks employ a “hammer grip” in which all four fingers are wrapped around the handle and the blade is perpendicular to the body. When you’re wielding a kitchen knife, you shouldn’t resemble Jason from Friday the 13th.
2. Learn to chop properly. The first step in learning how to correctly handle a kitchen knife is mastering the chop. While there are a variety of methods for chopping food, there are a few simple criteria that novices may simply learn to follow. Learning to keep your guiding fingers carefully tucked away and make safe cuts is crucial to kitchen safety.
- With the tip-fulcrum method of chopping, the blade never actually leaves the cutting board. You will utilize the tip as a pivot point to lift and lower the blunt end of the blade while driving the knife firmly into the food you are chopping.
- With the wrist-fulcrum approach, the black side of the blade near the grip will never leave the cutting board, and the tip will move up and down from the pivot point at the rear to cut through food. Often used for slicing onions and other vegetables.
- Never slam your knife against the chopping surface when slicing a vegetable. There is no justification for doing this, as it is unsafe and will dull the blade.
3. Learn to guide the food properly. Grasp the knife with your dominant hand and curl the fingers of your other hand inward to form a claw. Use a carrot or an onion for practice, and set your claw on top of the food you’re slicing. Put the blade’s flat side against your claw’s knuckles, tucking your knuckles under and out of the way. Use your claw hand to guide the food beneath the blade, and your cutting hand to turn the blade.
- Many chefs prefer to demonstrate their speed when preparing food. It appears menacing and opulent. While this is the “correct” manner of chopping, the proximity of the guiding fingers to the blade makes many chefs anxious. It is safer than having your fingertips exposed, but it takes practice to become accustomed to it. Do what feels natural and proceed slowly until you gain experience.
4. Learn to top and tail. Attempting to cut oblong or circular produce can be risky, thus it is usual practice to establish a level working surface for chopping, dicing, or making any other necessary cut on your veggies and fruits. “Topping and tailing” refers to the procedure of removing the sometimes-dried or thin top and bottom ends of produce to provide a smooth surface to work on.
- Before beginning, potatoes, tomatoes, onions, and other rounder fruits and vegetables must be topped and tailed. Remove the vegetable’s ends by slicing them off, then discarding them. Commonly, one would cut a tomato in half from flat side to flat side, then chop or dice each half separately.
5. Use the dice to create uniformly smaller pieces. Chopped veggies are chopped into bite-sized pieces, but diced vegetables are often a few millimeters square and considerably smaller. By scoring vegetables and fruits through before slicing them at a perpendicular angle, it is possible to achieve a dice that is often quite consistent.
- Scoring vegetables in two directions at an even spacing, then dicing them by slicing them at an angle perpendicular to the scoring.
6. To dissolve veggies, mince them. Mincing refers to the process of chopping vegetables and other foods so finely that they dissolve in the pan when cooked. Garlic is often chopped. To mince something, you will begin by dicing it, then repeatedly run your knife back and forth across the pile to get the smallest feasible size. The final product should be somewhere between a paste and dice in consistency.
7. Cut herbs and other greens into thin ribbons. The chiffonade technique is often used to garnish salads, soups, roasted meat, and pasta dishes with tiny, consistent curls of fresh greens and herbs. Spinach and basil are among the most often chiffonaded veggies. It’s considerably more straightforward than the elegant French name indicates.
- To chiffonade, you’ll coil each leaf of the vegetable you’re chopping into a tight tiny roll before slicing at regular intervals. It should provide beautiful, uniform pieces of green that you may use to garnish your food.
8. Julienne veggies for garnishing. The julienne is one of the more sophisticated cuts you can master, and it’s a fascinating way to add flavor or garnish to a dish, according to some. Root vegetables, such as carrots, beets, and cucumbers, are frequently julienned. To chop vegetables, they need to be rather firm. You would likely be unable to julienne a tomato.
- Cut the food into 1/8-inch-thick planks of uniform length, stack the planks, and then slice them into thin strips. Each slice should be approximately the length of the gap between your knife’s rivets.
Part-2 Maintaining Knives
1. After usage, clean knives with dish soap and warm water. Clean knives with a clean cloth immediately after use to remove food particles and other debris from the blade. The longer a knife is wet and soiled, the more its blade and steel quality degrades. Between usage, it should be kept clean and dry.
- Wash each knife separately with hot soapy water with great care. Do not place a large kitchen knife at the bottom of a sink so that you must fish for it. There should be no need to soak knives.
- Do not clean kitchen knives in the dishwasher, particularly if the handle is made of wood or another material that might become waterlogged.
2. Sharpen your blades frequently. Honing a blade entails removing nicks, burrs, and dents from the blade in order to reset the edge’s angle. This must be done at a 20-degree angle using knife steel on a regular basis.[7] If you use your knives often in the kitchen, you should sharpen them after every use or every couple of uses .[8]
Step 16 of an image titled Use a Knife
3. Sharpen knives once a year on average. A knife that is dull is a hazardous knife. The optimal angle for sharpening kitchen knives on a whetstone is between 20 and 23 degrees. For a few bucks per knife, you may have your knives professionally sharpened, which is often the best option if you have several high-quality knives. Always sharpen blades with uniform pressure and lengthy, even strokes in the same direction.
- If you use your knife more frequently, it may be prudent to sharpen it more frequently. If you cut carrots every day with your kitchen knife, you should be able to keep it functional by sharpening them often, but you may need to get it professionally sharpened every couple of months.
- A paper sheet should be readily cut through with a sharp kitchen knife. If your blades are dull, the chance of slipping on slippery vegetables and slicing your fingers is significantly increased, hence it is essential to only use sharp knives. Still sharp enough to cut your finger, dull blades are far more deadly.
- Always use a sharpener developed exclusively for the material of your blades.
4. Use plastic or wooden cutting boards. Chopping on a slate or granite countertop is a surefire way to severely damage your knives, to say nothing of how you’ll mar your countertops. Chopping on wooden or plastic cutting boards is the most effective method for keeping blades in good condition.
Part-3 Choosing the Right Knife
1. Invest in a versatile utility knife for the kitchen. If you only have room for one knife in the kitchen, use a versatile knife. A high-quality utility kitchen knife may be used for chopping, slicing, and a variety of other tasks. It is the most versatile instrument you can have in the kitchen. Even if your other instruments are cheap and dull, a decent kitchen knife will enable you to continue cooking.
- There is no “best knife” or optimal kitchen knife. If you’re in the market for a high-quality knife set, you should consider purchasing a single high-quality knife plus several lesser subsidiary knives. The majority of cutting tasks in the kitchen may be accomplished with a knife that is around 5 inches (12.7 cm) long, triangular, and made of stainless steel or another material.
2. Use a chef’s knife to chop, mince, and dice. Chefs’ knives are heavy-duty blades that are also referred to as “kitchen knives.” For some chefs, a fine chef’s knife is the sole essential slicing instrument in the kitchen, helpful for making precise thin slices of fruit, crushing garlic bulbs, and cutting onions, but not for stirring!
- Several kinds of ceramic, steel, and polycarbonate kitchen knives are available. Western-style kitchen knives are often larger and designed for chopping, but Japanese-style kitchen knives are typically slimmer and made of stronger steel.
3. To peel fruits and vegetables, use a paring knife. Paring knives are another incredibly common kitchen tool that is often relatively little and used for peeling and slicing, but not for chopping or other important knife abilities.
- Apples, pears, and stone fruits are ideal candidates for slicing with a paring knife, as are other fresh fruits.
4. Use a bread knife to slice. Knives with serrated blades are ideal for slicing bread. There is nothing more annoying than making a large loaf of soft brown bread and then attempting to slice it with a kitchen knife. Also, a serrated knife is ideal for cutting roasted pork joints and other foods, making it a useful cooking tool.
5. Choose knives with appropriate weight and balance. You want a nice balance and weight between the blade and the tang, the steel that extends into the handle of a decent utility kitchen knife. The finest knives are forged from a single piece of steel and are well-balanced. Verify by balancing the knife on your index finger, right above the handle. It should feel substantial in your hand, allowing you to let the knife do the work.
Bottom Line
In conclusion, learning how to use a knife is a fundamental skill that everyone should acquire. In addition to its usage in the kitchen, a knife has several other applications, including camping, hunting, and self-defense. It is essential, however, to handle a knife responsibly to avoid accidents and injury. Always use a knife on a firm surface and keep your fingers and other body parts out of the path of the blade. Also, maintain a sharp knife to make cutting simpler and safer. Keep in mind that a dull knife is more hazardous than a sharp one. By adhering to these principles, you may become adept with a knife and get all of its benefits.